» Jump to recipes using Beets as an ingredient
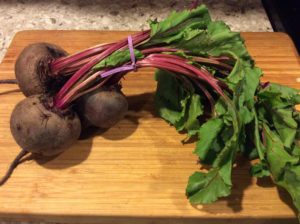
Beets– (Root Vegetable)
The root or bulb portion of the beet plant. It has a sweet earthy flavor.
Beets can be roasted, boiled, sautéed, pickled
Remove the beet roots from the greens, scrub. The greens and root are both eatable. The greens are cooked like any leafy green, the root can be eaten cooked or raw. Beets can be peeled before or after cooking. The skin can be used as a way to tell if the beet is cooked, the skins should slide off easily when ready.
***NOTE: Beets stain both clothing and skin. You can choose to wear gloves when preparing them and an apron may be a good idea as well. To clean your hands and cutting board after preparation use a mix of baking soda and water.***
Red Beets, also known as table beets
Chioggia or “candy stripe”-named because of their red and white stripes and sweet flavor. The stripes will fade when cooked, so this is a great beet to slice thinly and use for presentation in a salad.
Golden Beets- milder in flavor than a traditional beet and bright yellow or golden colored.
Remove the greens from the bulb and store them separately, leaving about an inch of the tops attached to the bulb. Store the beets in a plastic bag in the refrigerator for 2-3 weeks.
For winter storage, Farmer Jamie reminds us that a good way to preserve them is to give them a good rinse and pat dry when you get them home. Toss them in a ziploc bag in the fridge, and this will help to avoid the wilty wobbly veggies. Separate greens from the veggies right away too (such as with the radishes). If the bite of a radish is too much, you can cut them and leave them soaking in water in the fridge for a few days, and this will reduce the bite while keeping the veggies crisp.
For longer term winter storage, please see Jess’ “root cellar” tip below.
Vitamin A, C, folate, potassium, fiber, iron, magnesium
 On pickup day, foil is Jess’ go-to method of cooking root veggies for use in recipes throughout the week. The beets here were drizzled in olive oil and kosher salt. The carrots were drizzled in Ben’s Maple Syrup and a pat of Amish roll butter. The radishes were honey roasted.

This is what Jess has after roasting at 400 for a spell. The carrots and radishes were done faster. Don’t forget to save the radish tops to serve with the radishes! This was a quickie version of honey roasted radishes, but check out this version for the most delicious full Monty recipe.
Don’t throw the peels away! Check this out!
Bring a pot of water with all of the peels from 1-2 beets and 1/2 cup of vinegar to a boil. Turn the heat off and cool the liquid completely. Place cooked and peeled hard boiled eggs into the cooled liquid and refrigerate over night. The next day when you remove the eggs you have a really fun start to a festive deviled egg!

If you’re enjoying your beets in the winter and feeling daring, fill a spray bottle with beet water and let the kids decorate your snow banks (being wary that they don’t try to decorate themselves, as I have no tips for removing beet stains from clothes).
—
Jess here to talk about longer-term beet storage for a moment. There are many methods out there for storage, and what I’m talking about below is one approach that works for me, however feel free to explore what will work best for you, your households’ temperatures, humidities, lifestyles, etc.
One method of storage is a root cellar. No, you do not need to build an addition on your house or go digging up your yard to have one (though you can if that’s how you roll). You may recall that last year I had 50 pounds of carrots stored throughout the season in a simple cardboard box setup, and the carrots lasted just about 6 months before we finished up the last of them- it was amazing!
Here is a simple root cellar setup.

Obtain a sturdy cardboard or wooden box.

Line it with paper.
Layer in your prepped root veggies. Veggies should be trimmed (of tops, but leave the “stubble at the top” or you can invite rot) and healthy (blemished veggies also invites rot). There is no need to pre-wash these, some dirt is a-ok. Next, cover them with sand (sawdust and potting soil also works- this year I’m using a 3 dollar bag of play sand) and repeat between layers.
Store in a cool (not below freezing but not warm) place (in my house, this is a three season mini-room off in the garage).
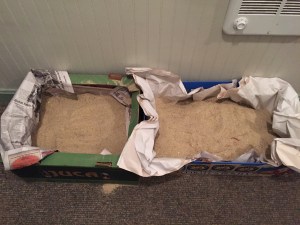
“Harvest” your veggies as desired. (Here I have a sandbox of beets and a box of carrots. In the cellar (my actual cellar, not the root cellar), I have my squashes stored in a crate. As the fall goes on, I’ll move into a second and possibly third crate.
Recipes Using Beets
A great comfort food to get you through the winter doldrums (or a depressing Superbowl). This is a very flexible recipe. Turnips, small diced sweet potatoes, and carrots would also work as your primary veggies. Substitute the beef for ground pork, chicken, goat (chorizo!), turkey or tofu (though I’d recommend adding the latter about 30 minutes from the end of cook time). As always, make it your own!
Yes, this recipe is “Grandma’s” posted by Pam Maxson Rodriguez and harkening from a time where copious amounts of sugar were not a deterrent on the dinner plate. I subbed the can of beets for the real deal (golden beets in the photo, sliced thinly), and found it to be a bit too sweet with fresh beets, and cut back just a bit on the sugar and enjoy!


